6 results for projects in tags

Clear

Broadside

I wanted three things that should have been one thing.

A blog I actually own. An app on my phone so I can post from wherever I happen to be standing. And a way to write something once and have it turn up on the places people read, without me copying and pasting it four times.

None of that is exotic. All of it exists. The problem is that it exists as three separate subscriptions from three separate companies, and every one of them wants a monthly payment for the privilege of holding my own writing. Paying rent on the thing I wrote seemed like a strange arrangement to accept, so I stopped accepting it.

Broadside is what came out of that.

What it actually is

A blog that stores your posts as plain text files in a folder.

That is the whole idea, and everything else follows from it. There is no database. There is no build step. There is no plugin system, no theme marketplace, no admin panel with forty tabs. You write a post and it appears, because the site reads the folder.

The files sit in dated directories:

site/
├── posts/      2026/08/09/01-broadside.md
├── uploads/    2026/08/09/01-diagram.png
└── core/       config.json, credentials, revisions

Sort those paths alphabetically and they come out in chronological order, which is a small thing that makes a lot of other things easy.

The server is one Go binary. No runtime to install, no interpreter, no package manager. The container image is built FROM scratch, which means it contains the binary and nothing else at all — no shell, no libc, nothing to patch and nothing for anybody who breaks in to run. It comes to about fifteen megabytes and sits at roughly eight megabytes of memory while serving pages. That is measured, not guessed. It runs happily on a Raspberry Pi.

Your content folder is the only thing on the host. Back that one folder up and you have backed up the site: settings, credentials, posts, images, revision history. There is no export feature because there is nothing to export from. If you want to leave, you copy a directory. That is the entire exit plan, and I think a project should be honest about having one.

The part I actually cared about

Every post, every image, every setting is reachable over an HTTP API with a bearer token.

That sounds like a developer feature and it is really not. It is the reason the project exists. It means n8n or Node-RED can publish to my blog, and once a workflow can publish to my blog, it can pick that post up and push it wherever else I want it to go. Write once, let the automation do the tedious part.

That is the piece nobody sells you as part of a blog. Hosted platforms will happily give you a nice editor and then charge extra for the integrations, or offer none at all and expect you to keep doing it by hand. Here it is just the API the app itself uses. There is no privileged private interface — the app talks to the same endpoints your automation does, and anything the app can do you can do with curl.

The cross-posting workflows are the next thing I am building. The hooks they need are already in.

The app

There is now an iOS app, Broadside Blog, and it is native rather than a website in a jacket.

It has a block editor built for a thumb: paragraphs, headings, quotes, lists, code, pictures. Drag a block when the order comes out wrong. Add a second photograph to a picture block and it quietly becomes a gallery your readers can swipe through, because when you add the first one you rarely know yet whether there will be a second.

Uploads keep going after you leave the app. That sounds like a footnote until you have tried to send a stacked astrophotography frame over a home connection. Those run to several hundred megabytes and take minutes, and an upload that dies the moment you switch apps is not an upload at all. The transfer gets handed to the system, so you can put the phone in your pocket and it finishes on its own.

Drafts, scheduling, tags, and your site’s colours are all in there too. Free, no adverts, no analytics, no tracking, no account to create. The app talks to your server and to nothing else, because there is nowhere else for it to talk to — I run no servers that could collect anything even if I wanted to.

Installing it

One command:

docker run -d --name broadside \
  -p 5555:5555 \
  -v /path/to/your/site:/site \
  --user 1000:1000 \
  --restart unless-stopped \
  noxegenus/broadside:latest

Open it, and the first page asks you to create your account. Nothing is reachable until you do.

There is no reverse proxy inside the container, on purpose. If you want TLS and a domain you almost certainly already run Caddy or nginx or Traefik, and a second proxy inside the container would just be two proxies in a row. Point the one you have at port 5555 and add --behind-proxy so the login rate limit counts against the right addresses.

On Unraid, set PUID=99 and PGID=100 or the container will not be able to write to your share. That one catches everybody.

I will not pretend this is a thirty second sign-up. Standing up a server is an evening of work the first time. If you want to be typing in the next minute, a hosted platform is genuinely the better answer and I would rather say so than waste your evening. What you get for that evening is a blog that is still yours in ten years, that does not hand your readers to somebody else’s tracking, and that you can pick up and move whenever you feel like it.

Where everything lives

All of it is MIT licensed. The server is free, the app is free, and there is no paid tier waiting in the wings.

What it deliberately does not do

Broadside is not a CMS and is not trying to grow into one. No page builder, no plugin marketplace, no theme templating language, no comment system, no newsletter, no membership billing. Each of those is a real product on its own, and bolting them on is exactly how simple software stops being simple.

Theming is six colours and a couple of typefaces in a config file. If you need more than that you probably want a different tool, and that is a perfectly fine outcome.

I built this because the thing I wanted did not exist as one piece, and renting it in three pieces was absurd. It exists now. If it is useful to you as well, take it.

Laser Project - Configuration

The Laser Project is a custom-built unit powered with the BIGTREETECH Rodent and a Laser Tree K30. This project has been designed and built from the ground up as a project for learning about cartesian-based CNC operations (and fueled with a passion for high-powered laser cutting!).

Parts, models, & components: coming soon.

Configuration:

Based on the design of this project, below is the configuration used for FluidNC. Because the laser design was only a 2-axis design, the z-axis configuration model has been removed and motor1 in the y axis configuration was added (with the pin settings from z). Furthermore, there has been a lot of ambiguity on the proper entries to use for FluidNC regarding the Rodent board. The overall consensus here was to utilize the guidance from BigTreeTech’s FluidNC Page and BigTreeTech’s GitHub.

The most important part of this section is utilizing the proper pins for each entry module. Based on the FluidNC’s guide, the following pins are the correct entries for each motor:

PIN DRIVE
I2SO.0 X DISABLE
I2SO.1 X DIRECTION
I2SO.2 X STEP
I2SO.3 LED R
I2SO.4 Y DIRECTION
I2SO.5 Y STEP
I2SO.6 NOT USED
I2SO.7 Y ENABLE
I2SO.8 Z DISABLE
I2SO.9 Z DIRECTION
I2SO.10 Z STEP
I2SO.11 LED B
I2SO.12 A DIRECTION
I2SO.13 A STEP
I2SO.14 LED G
I2SO.15 A DISABLE

Here is the original rodent.yaml file that was included on the BTT Rodent board. This configuration was part of the FluidNC 3.0.8 NoGit version. During this process, the Rodent firmware (FluidNC) was updated to 3.8.2.

According to FluidNC’s wiki, the BTT Rodent has one small quirk that will cause the TMC drivers to not function properly; that is, if you only have 3 motors…

The spi_index value in the config file indicates which driver you are configuring. They are numbered 1 through 4, from left to right. FluidNC needs to know that there are 4 motor drivers in the daisy chain. If you are using less than 4, one of the drivers you need to use is number 4.

FluidNC’s Rodent Wiki Page

This led to two initial options, but ultimately, the best solution was to move the Y2 motor cable from the Z header to the Y header and reconfigure motor1 to use the A pins in the configuration.

Here is the configuration file used to get motion working:

board: BTT Rodent V1.0
name: BTT CNC
meta: (04.12.2024) by BTT

kinematics:
  Cartesian:

stepping:
  engine: I2S_STATIC
  idle_ms: 255
  pulse_us: 4
  dir_delay_us: 1
  disable_delay_us: 0

axes:
  shared_stepper_disable_pin: NO_PIN
  x:
    steps_per_mm: 80.000
    max_rate_mm_per_min: 5000.000
    acceleration_mm_per_sec2: 100.000
    max_travel_mm: 800.000
    soft_limits: false
    homing:
      cycle: 1
      positive_direction: false
      mpos_mm: 150.000
      feed_mm_per_min: 100.000
      seek_mm_per_min: 200.000
      settle_ms: 500
      seek_scaler: 1.100
      feed_scaler: 1.100

    motor0:
      limit_neg_pin: NO_PIN
      limit_pos_pin: gpio.35
      limit_all_pin: NO_PIN
      hard_limits: false
      pulloff_mm: 1.000
      tmc_5160:
        step_pin: I2SO.2
        direction_pin: I2SO.1:low
        disable_pin: I2SO.0
        cs_pin: gpio.5
        spi_index: 1
        r_sense_ohms: 0.075
        run_amps: 1.000
        hold_amps: 0.500
        microsteps: 16
        toff_disable: 0
        toff_stealthchop: 5
        use_enable: false
        run_mode: CoolStep
        homing_mode: CoolStep
        stallguard: 16
        stallguard_debug: false
        toff_coolstep: 3
        tpfd: 4

  y:
    steps_per_mm: 80.000
    max_rate_mm_per_min: 5000.000
    acceleration_mm_per_sec2: 100.000
    max_travel_mm: 800.000
    soft_limits: false
    homing:
      cycle: 1
      positive_direction: true
      mpos_mm: 150.000
      feed_mm_per_min: 100.000
      seek_mm_per_min: 200.000
      settle_ms: 500
      seek_scaler: 1.100
      feed_scaler: 1.100

    motor0:
      limit_neg_pin: NO_PIN
      limit_pos_pin: gpio.34
      limit_all_pin: NO_PIN
      hard_limits: false
      pulloff_mm: 1.000
      tmc_5160:
        step_pin: I2SO.5
        direction_pin: I2SO.4:low
        disable_pin: I2SO.7
        cs_pin: NO_PIN
        spi_index: 2
        r_sense_ohms: 0.075
        run_amps: 1.000
        hold_amps: 0.500
        microsteps: 16
        toff_disable: 0
        toff_stealthchop: 5
        use_enable: false
        run_mode: CoolStep
        homing_mode: CoolStep
        stallguard: 16
        stallguard_debug: false
        toff_coolstep: 3
        tpfd: 4
        
    motor1:
      limit_neg_pin: NO_PIN
      limit_pos_pin: gpio.33:pu
      limit_all_pin: NO_PIN
      hard_limits: false
      pulloff_mm: 1.000
      tmc_5160:
        step_pin: I2SO.13
        direction_pin: I2SO.12
        disable_pin: I2SO.15
        cs_pin: NO_PIN
        spi_index: 4
        r_sense_ohms: 0.075
        run_amps: 1.000
        hold_amps: 0.500
        microsteps: 16
        toff_disable: 0
        toff_stealthchop: 5
        use_enable: false
        run_mode: CoolStep
        homing_mode: CoolStep
        stallguard: 16
        stallguard_debug: false
        toff_coolstep: 3
        tpfd: 4
        
i2so:
  bck_pin: gpio.22
  data_pin: gpio.21
  ws_pin: gpio.17

spi:
  miso_pin: gpio.19
  mosi_pin: gpio.23
  sck_pin: gpio.18

sdcard:
  cs_pin: gpio.0
  card_detect_pin: NO_PIN
  frequency_hz: 8000000

# Begin Huanyang
uart1:
  txd_pin: gpio.15
  rxd_pin: gpio.16
  rts_pin: gpio.14
  baud: 9600
  mode: 8N1

Huanyang:
  uart_num: 1
  modbus_id: 1
  tool_num: 0
  speed_map: 0=0% 0=25% 6000=25% 24000=100%
  off_on_alarm: false
  
# PWM:
#   pwm_hz: 5000
#   output_pin: gpio.13
#   enable_pin: gpio.25
#   direction_pin: gpio.15
#   disable_with_s0: false
#   s0_with_disable: false
#   spinup_ms: 0
#   spindown_ms: 0
#   tool_num: 0
#   speed_map: 0=0% 10000=100%
#   off_on_alarm: false

i2c0:
   sda_pin: gpio.27
   scl_pin: gpio.26

status_outputs:
  report_interval_ms: 500
  idle_pin: I2SO.11:low
  run_pin: I2SO.14:low
  alarm_pin: I2SO.3:low

Custom Armbian for Orange Pi 5B

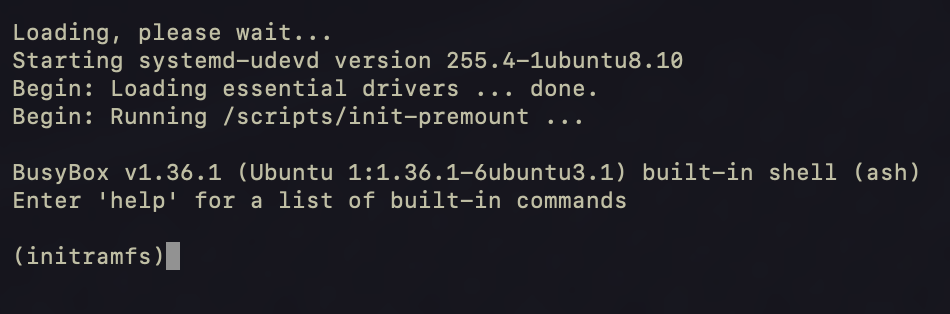
After attempting to install the Armbian 6.12 image on the Orange Pi 5B, there seemed to be compatibility issues that caused the image to drop into initramfs console.

armbian-initramfs

From a little bit of analysis, it appeared to be an issue with some of the initial setup scripts. However, multiple attempts with multiple images rendered the same results.

The simplest solution was to build the Armbian image from the source code to see if it was something that could be identified during the build process.

Preparing the Environment

While not explicitly stated anywhere that I could find on Armbian documentation; I thought that Ubuntu Server would be the best virtual machine to build the image in. Using Unraid as the bare-metal server; I created a virtual machine that would be able to make quick work of the build process for Armbian.

Virtual Machine Configuration:

vCPUs 16
Memory 32768 MB
Machine Q35-9.2
BIOS OVMF
USB Controller (not important) 2.0 (EHCI)
Primary vDisk Bus VirtIO
vDisk size 2 TiB
Graphics Virtual
Console Protocol VNC
Console Video Driver QXL

CPU count and memory were the most important for this project, followed by disk size. With 16 cores and 32 GiB of dedicated memory, the entire build process took approximately 30-45 minutes.

For building Ubuntu Server, the default values for everything were perfect. No additional packages needed to be added from the installer. I did enable ssh and ensured that the user was created with administrator permissions as well.

When searching for the best way to configure the build environment, it seemed like Armbian fell short on this explanation as well. There are a few packages that need to be installed for the build process to be successful. Of note, I did NOT apply the latest updates to this build. There are many reasons, but the primary is the stability of the LTS server image. Since the Armbian image is being built with docker, the host OS (or in this case, the virtual machine) does not need to have the bleeding edge. Stability is key for success!

(root)_# apt update
(root)_# apt install ca-certificates curl gnupg  
(root)_# install -m 0755 -d /etc/apt/keyrings

(root)_# curl -fsSL https://download.docker.com/linux/ubuntu/gpg | sudo gpg --dearmor -o /etc/apt/keyrings/docker.gpg

(root)_# chmod a+r /etc/apt/keyrings/docker.gpg
(root)_# echo \
  "deb [arch="$(dpkg --print-architecture)" signed-by=/etc/apt/keyrings/docker.gpg] https://download.docker.com/linux/ubuntu \
  "$(. /etc/os-release && echo "$VERSION_CODENAME")" stable" | \
 tee /etc/apt/sources.list.d/docker.list > /dev/null

(root)_# apt update && apt install docker-ce docker-ce-cli containerd.io docker-buildx-plugin docker-compose-plugin screen git qemu-user-static binfmt-support

(root)_# groupadd docker
(root)_# gpasswd -a [YOURUSER] docker
(root)_# newgrp docker

(root)_# systemctl enable --now docker

This would be a good time to reboot the container so that everything just resolves. Sure, there are other ways to make sure that services are started and things work, but sometimes, a reboot just works!

Reboot

Ensure the docker service has started successfully. (systemctl status docker).

Log in as the user that was created at the installation. (I created the user ‘build’ for simplicity).

From the user’s home directory, clone the repo:
git clone https://github.com/armbian/build

Navigate to the build directory:
cd ~/build

Compile the image with the following command:

./compile.sh BOARD=orangepi5b BRANCH=current RELEASE=noble BUILD_DESKTOP=yes DESKTOP_ENVIRONMENT=gnome DESKTOP_ENVIRONMENT_CONFIG_NAME=config_default

Download

Download

Update

There appears to be some issues with the graphics regarding the use of Gnome/GDM/GTK. Xfce seems to work fine, but when GDM is started with Wayland, the graphics service becomes unresponsive. This might have something to do with Mesa, Libmali, or Panfrost. More to follow.

As of now, the image works in a minimal configuration.

Orange Pi Astrophotography Project

I’m already at a disadvantage with my setup as my primary computer is a MacBook Pro M3. As I’ve learned over the years; Mac laptops are amazing computers and have a superior battery life, but they really lack that extra support. Regardless, I have found my way 95% of the time and I am willing to give it a go.

Remember what your goal is. You’ve set out to install Arch Linux on the Orange Pi 5 Max, and get the most out of the device features while getting the most out of the latest mainline kernel.

The project is the beginning phase for creating a simple automation tool to process images taken from the SeeStar S30 astrophotography telescope.


Requirements

  • CIFS for mounting samba shares (the S30 uses samba as its main file-sharing capability).

If this falls short, you have options. There were reports of mtpfs working as well. Research is always an option if things go south.

  • Hailo M.2 module support for AI processing / offloading the workload of the RK3588 processor.
  • Wifi and Bluetooth support (not for any particular reason, but just to have it.)

Of note, if the onboard AP6611s wifi/bluetooth module doesn’t work, the alternative is to use the TP-Link AC1300 USB wifi dongle.

Phase 1

Getting the Arch Linux ARM image installed and booting Arch Linux ARM on the Orange Pi 5 Max.

There were a few places to obtain the Arch Linux ARM image, or it could have easily been built, but ultimately, the archlinux-installer project seemed like an easy solution to start with. Images were readily available for the Orange Pi 5 Max that appear to have more up-to-date blobs for dtb/dts with regard to device support.

Images were available to download.

The installation guide seemed relatively easy to follow along as well.

Knowing that there are hurdles ahead, cutting corners when possible is always acceptable, especially if this corner is trivial and doesn’t impact the end-goal outlined in the requirements. Work smarter, not harder.

Getting the image onto the EMMC chip.

Using the Mac terminal, home-brew tools, and a little bit of time, it seems relatively easy to install.

Direct flashing to the EMMC is the best option in my opinion because it’s quick and simple. The requirements are rkdeveloptool, mini-loader.bin file, USB OTG cable for the connection to the maskrom port (top-left USB port on the Orange Pi 5 Max), and the Arch Linux img file.

  1. Plug the USB into the computer and the maskrom USB port.
  2. Before connecting the power, hold down the boot rom button next to GPIO pins.
  3. From a terminal check if the board was detected in maskrom mode:
rkdeveloptool ld

Should get a response like this:

01-rkdevtool-response
  1. Next, download the boot loader (this is where the mini-loader .bin file comes in):
rkdeveloptool db /Users/roberts/Development/software/OrangePi/opi5m/cfg-bin-files/MiniLoaderAll.bin

Looking for that succeeded.

02-rkdevtool-db-bin
  1. Erase the flash. (Just in case anything might be there). Who knows if this is actually required, I just read it everywhere that it’s a good practice. So, in keeping with the tradition, wipe it!
rkdeveloptool ef

Takes about 15 seconds, and that complete message (that doesn’t have any errors around it) is always a welcome sight!

03-rkdevtool-ef-complete
  1. Flash the image. This is the longest part of the process. 5-10 minutes. Make sure to get that beginning sector right as well.
rkdeveloptool wl 0

Bathroom break while waiting for the completion…

04-rkdevtool-wl-start

Started a 3D print for an M.2 extender to be able to mount the Hailo module in the back side of the board.

And, the 100% LBA from file completion. Image is loaded, and should boot.

05-rkdevtool-wl-complete
  1. Reset the device (or just pull the power). I pulled the power to mount the Hailo module.

The M.2 extender worked pretty good. It holds the module in place. It should be even better once a case is designed that will fit the module and have multiple fans on it.

Note: Design a case for the Orange Pi 5 Max that will fit the Hailo module with its heat sink and have enough height for two fans. Need adequate cooling for this thing. Don’t want to be temperature throttled because of a careless oversight.

After the flash, the installer loaded, then the Orange Pi performed a reboot, and when it restarted, the installer was on the screen. This is off to a great start.

According to the install guide, connecting to wifi was a requirement. Once that was complete, the installation was extremely simple with only a few choices to make (kernel, desktop environment, user name and password), and that was about it. It seemed to go by pretty quickly.

Of note, The recommended kernel was this Joshua’s 6.10 kernel. Joshua-Riek Github. Haven’t heard of it, but again, get it to a working state first, then expand the horizon of possibilities.

Xfce was clearly the desktop of choice. Minimal footprint, low resource consumption. This is only important because of the deployment on an SBC.

The Custom CNC Laser. Updates to the Gantry.

Welcome back to the ongoing overview of my custom CNC laser project! If you’ve been following along, you know that this endeavor has been an interesting and time-consuming project full of innovation and problem-solving. In the latest chapter, I encountered a challenge with the gantry that required some creative solutions.

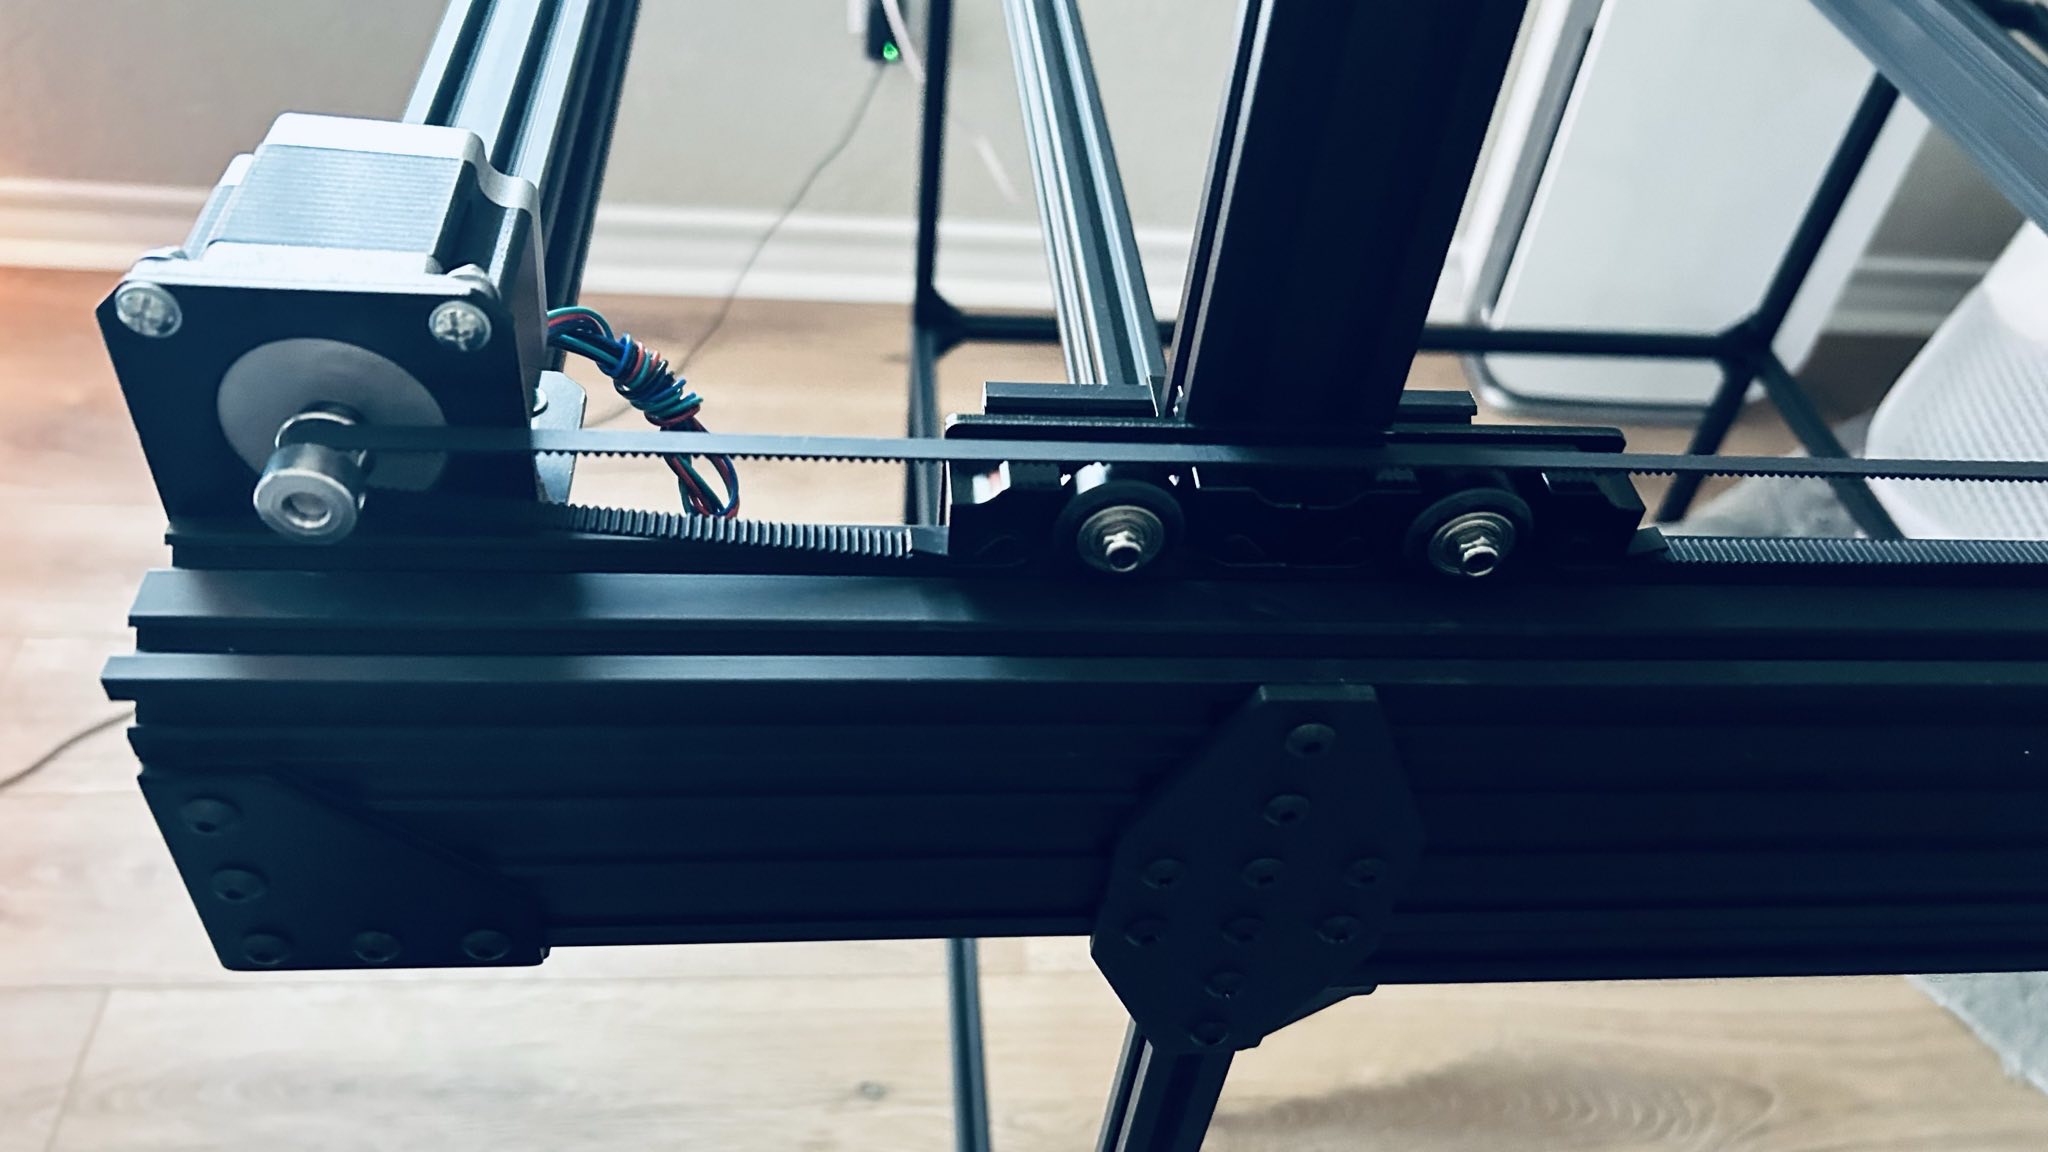
Originally, the gantry’s y-axis boasted a single cart for travel. But as the project was coming together and I added the z-axis travel, stepper motors, and the diode laser module, it quickly became clear that the weight was taking its toll. The gantry assembly started to present a huge problem of weight distribution.

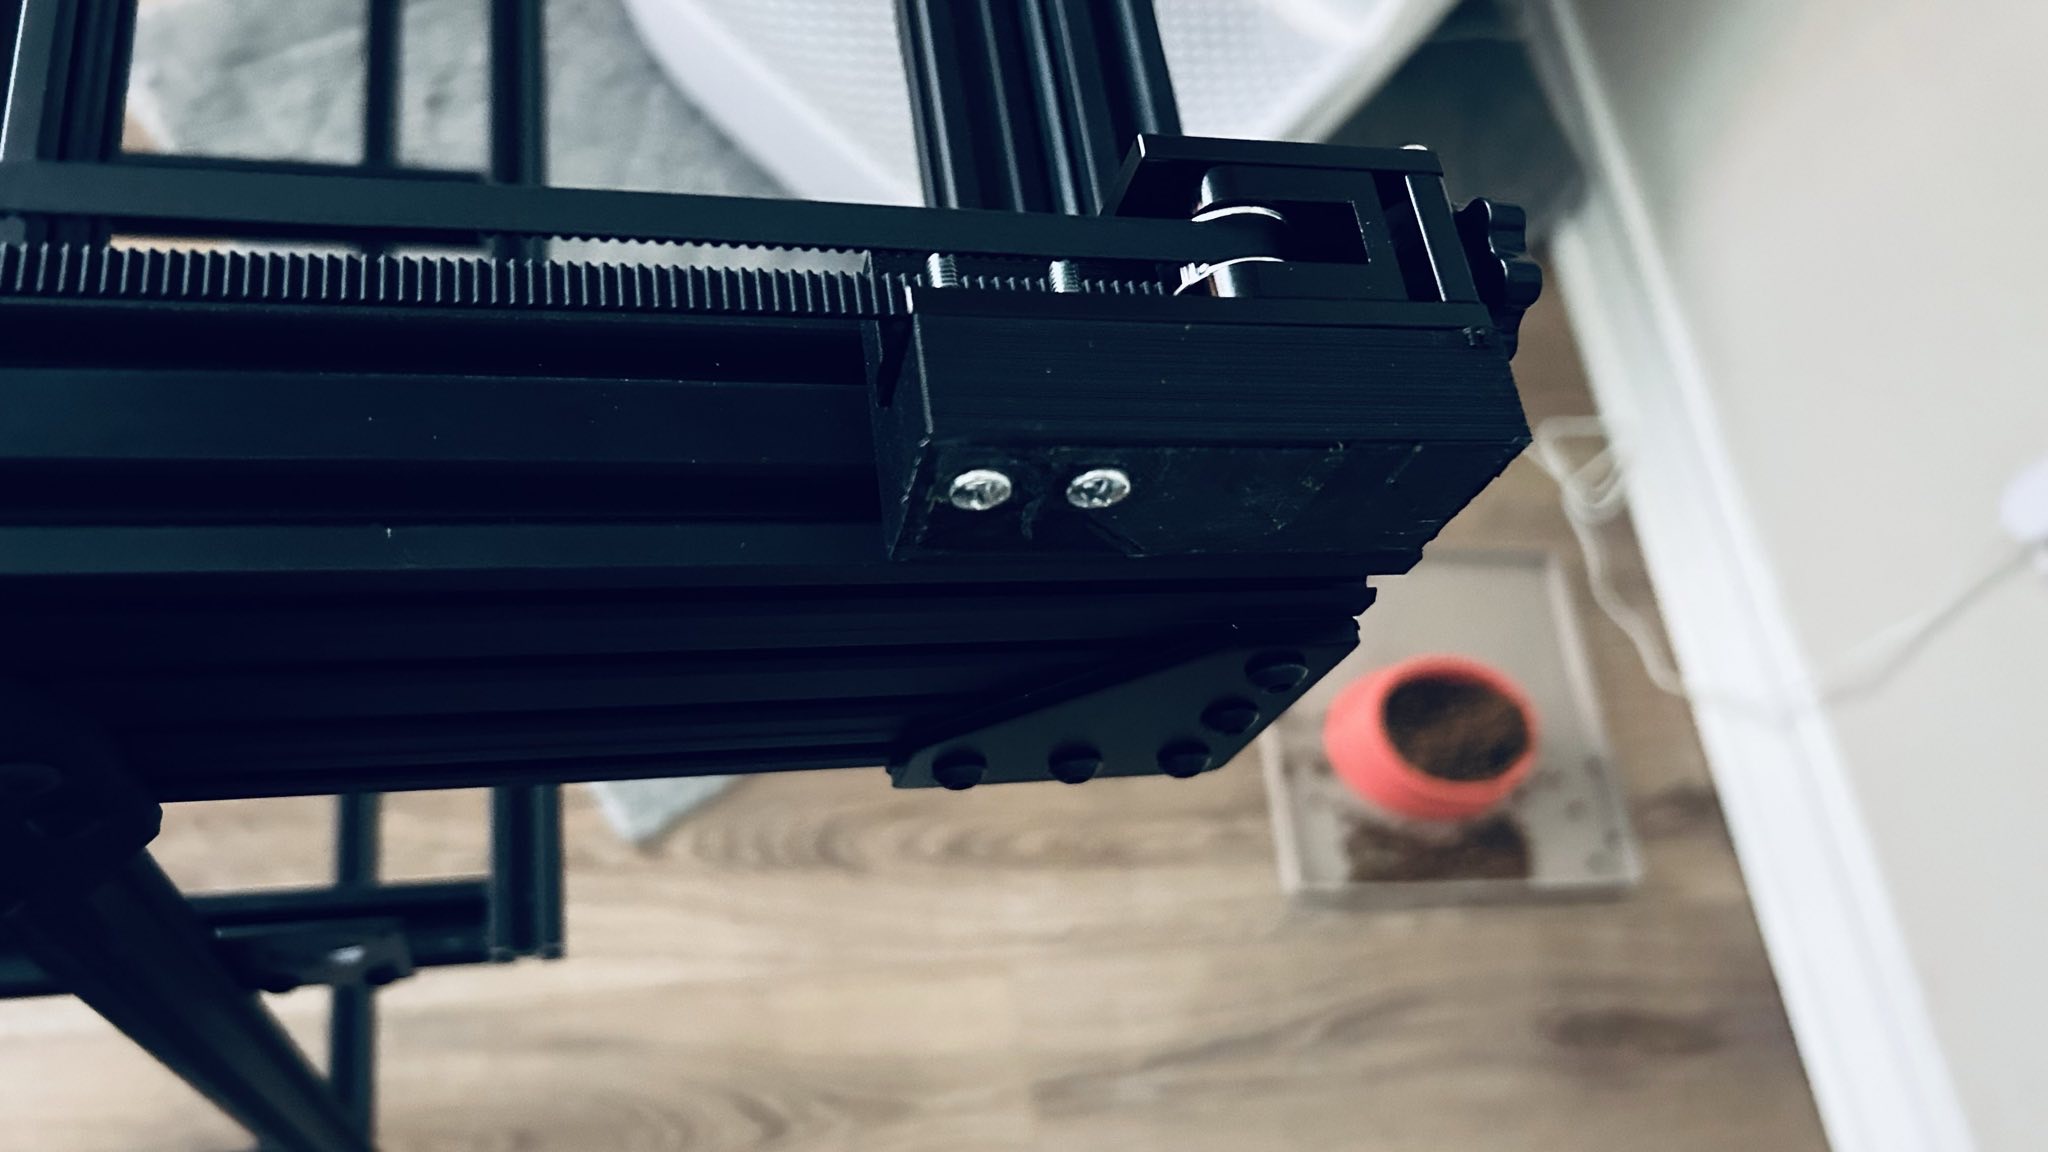
In a stroke of engineering brilliance (if I do say so myself), I decided to give the gantry a makeover. By adding an extra cart to both sides, I managed to distribute the weight more evenly. The result? A better design and a gantry that can support the weight without unneeded tension on the carts and rails.

Of course, implementing this change wasn’t without its challenges. It required a reconstruction of the gantry assembly, which felt a bit like performing surgery on a robot. But hey, who doesn’t love a good DIY medical procedure now and then? (insert corny laugh to a dumb joke).

Now, as I inch closer to the finish line, my focus shifts to re-attaching all the gantry parts, installing the cable chain, and mounting the electrical components.

Soon, all of this will start coming together and the project will come to life. In the meantime, I will continue to document my progress and share my journey.

If you’re just joining the party, you can catch up on the previous chapters of this process by checking out my other blog posts.

And, because everything is better with pictures… here are some updated photos to the changes I’ve made.

Organizing a Game Development and Music Asset Library

Another thing I’ve been meaning to do for some time is organize all of my game development and music production assets. I’ve been looking for a good web-based file browser that has advanced search features (potentially with AI) that can be hosted in a docker. This would make life easier when searching for things. Unfortunately, there aren’t many choices, so maybe I will get around to programming one myself; but in the mean time, I need to organize the files.

First, I downloaded all of my assets from the different store front websites. (Itch.io, GameDevMarket, Fanatical, Humble Bundle, AAS, what I could extract from Unity, and Unreal, and Patreon).

Next, on the server, I created my assets folder, and created the root structure for all of the assets. I haven’t really planned everything out yet, but I figured that if I started at the top, I could slowly start nesting the proper way. (The /STORES/ directory is just for holding the zip files until I get them sorted).

./assets
├── 3d-printer
├── STORES
├── artwork
├── audio
├── brushes
├── fonts
├── software
└── vst

Because I have a lot of assets, and I tend to “test” things out with bash during my process, I have a safe location for the original zip files so that I can recover if needed without having to download everything again.

According to ‘du’, the total size of my compressed asset collection is approximately 185GB.

# du -hLx /mnt/user/storage/Original\ Downloaded\ Assets/ | awk 'END{ print $1 }'
185G

Now, if you are like me, and you are also trying to organize your assets, I highly suggest you set up your collection storage like I did (with all of your original asset downloaded files in a separate location). It’s easy to identify missing files and manage what you’ve downloaded. For instance, I have about 130 purchases on Fanatical, and I have 130 downloads in my Fanatical folder. For someone like me, it just makes sense.

When ready, copy your assets into a temp folder where you can parse and organize your collection without modifying the originals.

# rsync -arp /mnt/user/storage/Original\ Downloaded\ Assets/ /mnt/user/assets/STORES/

(Remember how linux works, commands almost always following the [command] [arguments] [source] [destination] methodology.). And, if you need to look up what arguments I’ve used, you can ‘man’ the command or use ‘–help’.

  • ‘-a’ is archive mode; which preserves as many of the attributes possible
  • ‘-r’ is recursive mode; it will go into sub-directories and copy files and directories as well
  • ‘p’ is preserve permissions mode; this just keeps the permissions the same when copied. (Probably redundant with -a, but it’s a force of habit for me).

You can also use ‘–info=progress2’ if you want to see the approximate time remaining.

Now that there is a good copy of the library, the next step is to separate the most easily identifiable group first. I chose audio because they are simple to identify and most art-based assets don’t have audio files. I think the best starting group of file extensions is: wav, mid, midi, mp3, flac, acc, ogg, wma, and voc. Of course, if you need more, just add them in. This is just my list.

Because I know there are duplicates in my library, I do a simple find / delete to remove the files. It just so happens that Firefox appends a ‘(1)’ to the end of files that are downloaded twice (or that have the same name).

# find ./STORES/ -type f -iname "*(1)*"

After inspecting the list to make sure that nothing is wrong, then I just add remove at the end:

# find ./STORES/ -type f -iname "*(1)*" -exec rm {} \;

Now, this is also a smart time to standardize the names. A lot of times, these asset files don’t have a naming standard, so some things are all caps, some are camel case, some have spaces, while others use underscores or dashes. I like to remove all special characters with the exception of dash and dot. I also like to force everything to lowercase. It’s the easiest to work with at this moment. This bash line just finds all files within a directory (recursively), and then renames the file with the previously mentioned convention. (All lowercase and replaces spaces and underscores with a dash).

# find . -type f -exec sh -c 'new_name=$(echo "${1##*/}" | tr "[:upper:]" "[:lower:]" | sed "s/[ _]/-/g; s/[^a-zA-Z0-9.-]//g"); dir_name=$(dirname "$1"); mv "$1" "$dir_name/$new_name"' _ {} \;

This command will search all the zip files for these file extensions, if the zip file has this file type, then it will move the zip file to the specified location. This is probably one of my -more- favorite bash one-liners as it is very useful for looking in a zip file but not extracting it, and it is fairly quick.

# find ./STORES/ -type f -iname "*.zip" -exec sh -c 'unzip -l "{}" | grep -Ei "\.(wav|mid|midi|mp3|flac|acc|ogg|wma|voc)$" && mv "{}" ./audio/' \;

Next, I moved all of the stl files. (Same command, but this time I searched for ‘stl’ and ‘gcode’).

You can run this as many times as you’d like to get all of the desired zip files where they need to go. My goal is to just narrow everything down so that it’s easier to identify everything.